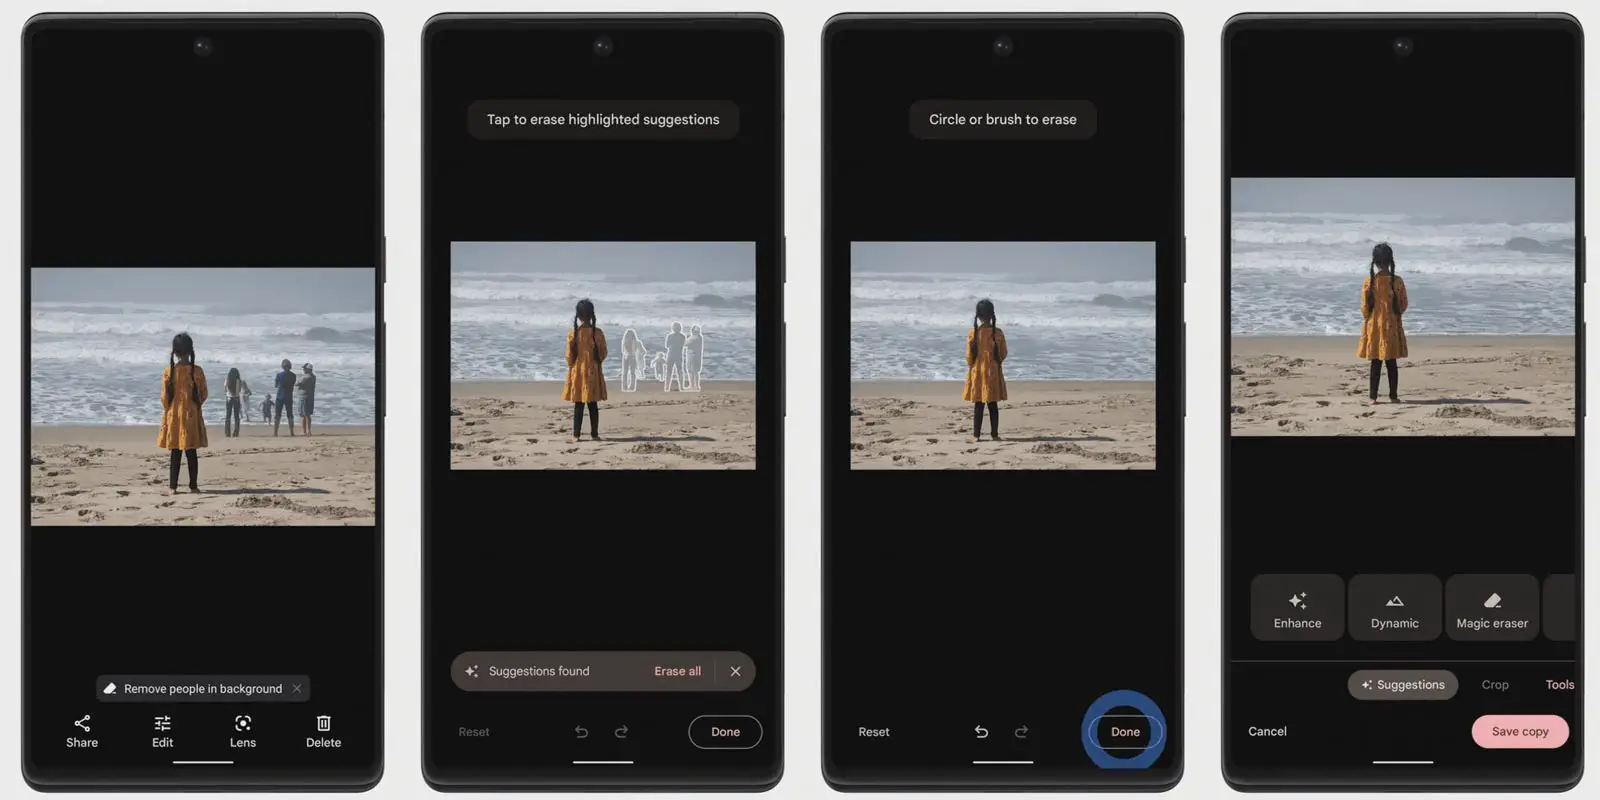
Google Pixel series almost always gets the newest sets of features and that’s not surprising. And on top of all of them, today we’ll focus on the handy tool called “Magic Eraser” among the recent feature updates.

It’s no wonder that taking a good picture is no cakewalk. And it can be a pain if you have people or objects photobombing you in between. Now, there have been ways to get rid of unwelcome photo bombing in the past but they usually used to take a lot of time and sweat to deal with. You’d even need additional skills and the means to do it as well. But with Magic Eraser you have your back and you can take that for certainty.
The Magic Eraser feature isn’t very recent. In fact, it has been around since 2021 and was introduced with the Pixel 6 and Pixel 6 Pro. Ever since then, the feature has been improved and kept as a must-have feature while also featuring in the new Pixel 7 series. It is also expected to be featured in the Pixel 8 series as well unless Google tells us officially that it won’t.

Taking advantage of this neat camera feature is as easy and useful in one package. And if you have a compatible Pixel phone that came with the Magic Eraser feature, you’d certainly need a how-to guide in your hands. Fortunately, we got your back. So keep on reading cause we’re about to share how to use and make the best out of the Magic Eraser feature in the easiest ways possible.
Supported Devices
Before explaining how to use the Magic Eraser feature and how to get the most out of it, we need you to make sure your Google Pixel is compatible with it. Here’s a list of Google Pixel series that support the Magic Eraser feature:
- Google Pixel 6
- Google Pixel 6a
- Google Pixel 6 Pro
- Google Pixel 7
- Google Pixel 7 Pro
![]()
Steps to Use the Magic Eraser Feature
1. Get Your Device Updated
If your Google Pixel device is compatible with the Magic Eraser feature, you should make sure to see if your Google Photos app is properly updated. Or the feature might not appear on some devices.
2. Select A Photo
Open the Google Photos app after it’s up to date and select the photo you want to use. The feature works on subjects in a picture both up close and afar with different solid textures.
3. Use The Feature
After you’ve selected the photo, make your way to tap on “Edit” and select the “Tools” category afterward. Then you can find Magic Eraser in that category and tap on it. The app will then scan the picture and prepare some suggestions of highlights you may want to erase. Just tap the subjects you want to get rid of. Alternatively, you can batch-select and get rid of all the highlights by tapping “Erase All”. No worries if you made a mistake in the process. There is an undo toggle button to make sure it was reverted.
You can also manually highlight objects that weren’t suggested after the scan. Use the brushing gesture to erase a subject manually. And don’t worry if your brushing shading isn’t perfect, the feature will automatically able to erase what you want to without issues.
